Set up an MCP
MyCoach Pro lets you create an MCP (Model Context Protocol) connection between your AI interface and your MyCoach Pro account.
You are solely responsible for enabling this integration.
MyCoach Pro cannot be held responsible for any data shared through this connector.
Prerequisites
A MyCoach Pro account configured for the MCP connector. Please contact us at support@mycoachpro.io to enable this feature on your account. Setup is handled case by case for each user.
Supported models
Claude setup
1 - Download the desktop app
Creating custom connectors for Claude requires the desktop app, available here: https://claude.com/download.
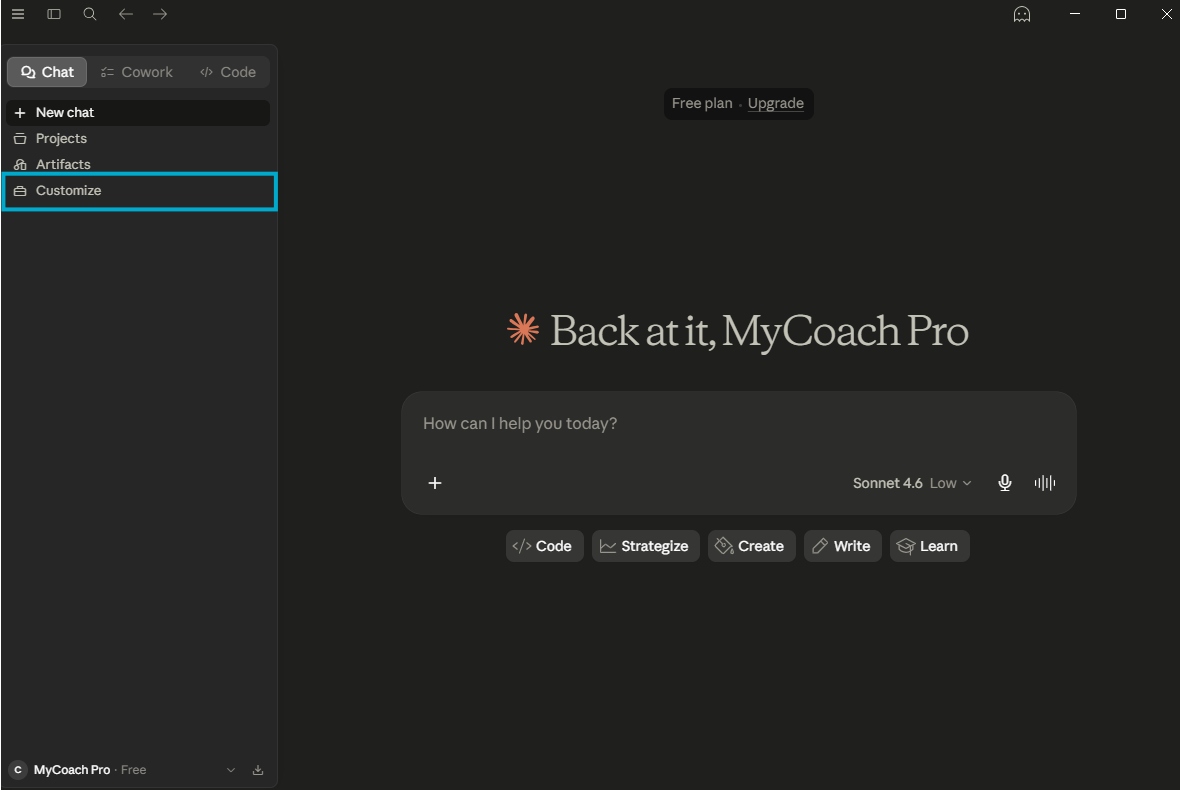
2 - Open the customization panel
Once Claude is installed and your account is signed in, click Customize in the left panel.
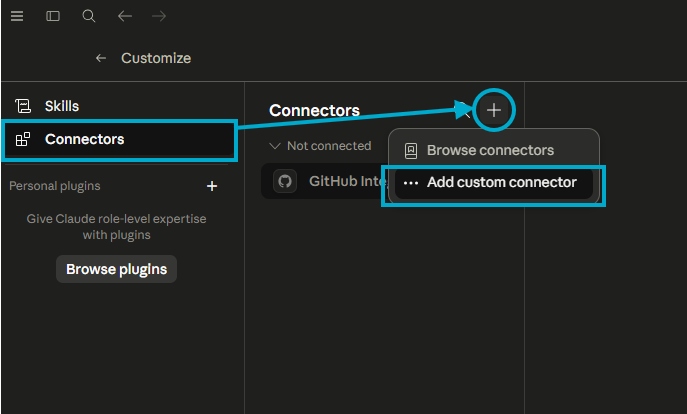
3 - Add a custom connector
Go to Connectors, click the + button, then select Add custom connector.
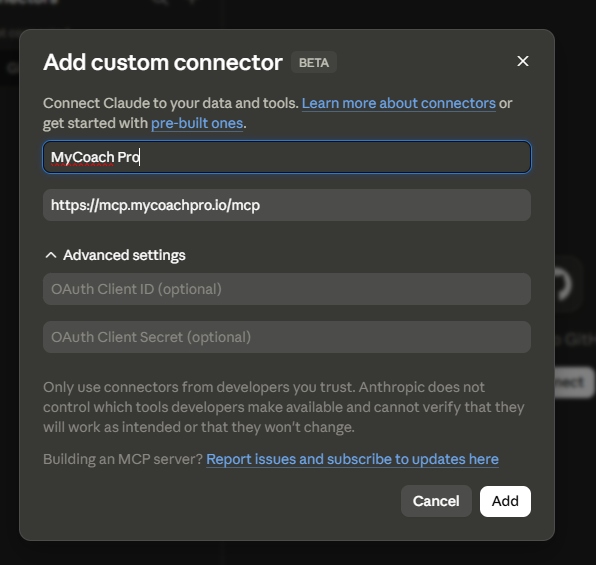
4 - Configure the MCP connector
A dialog opens. Name your connector, then enter the following MCP server URL:
https://mcp.mycoachpro.io/mcp
Click Add to confirm.
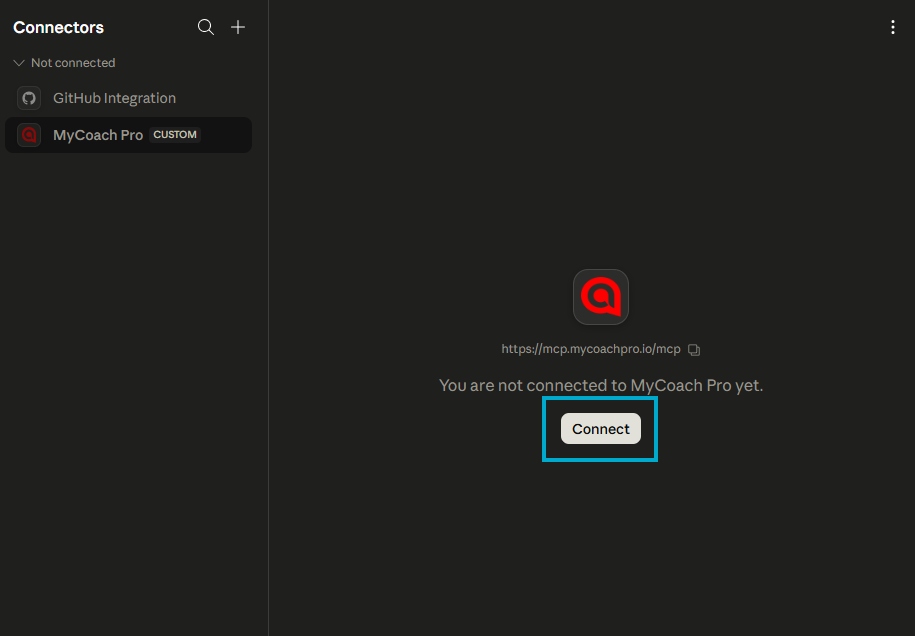
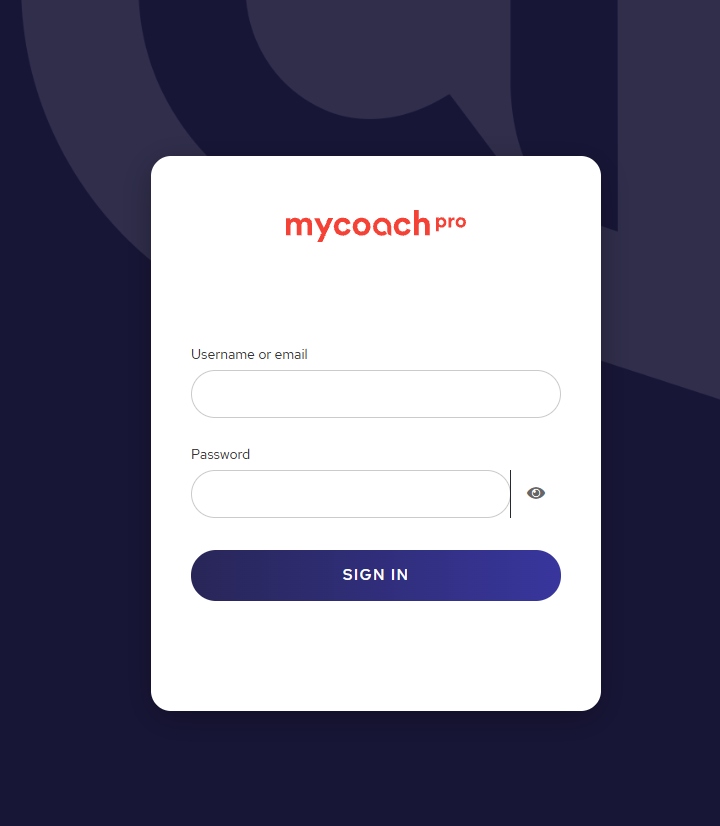
5 - Sign in to MyCoach Pro
Click Connect. You will be redirected to a sign-in page. Enter your MyCoach Pro username and password, then click SIGN IN.
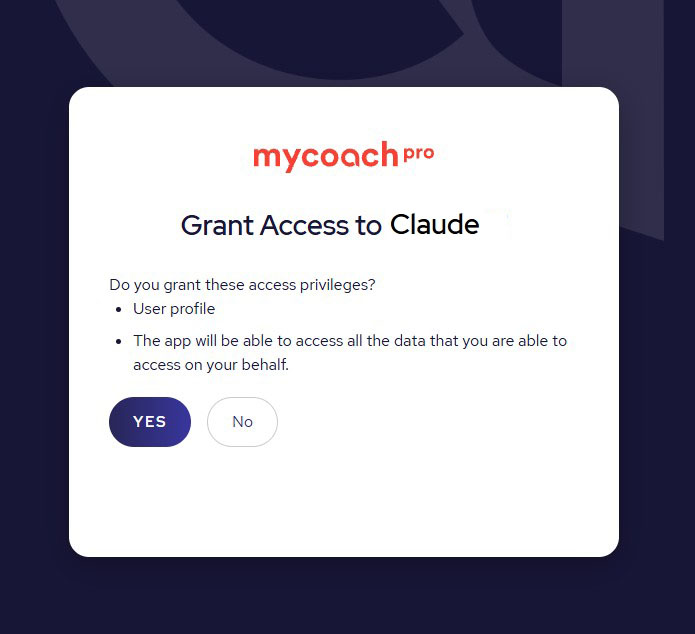
6 - Allow Claude access
Allow Claude to access your MyCoach Pro data by clicking YES.
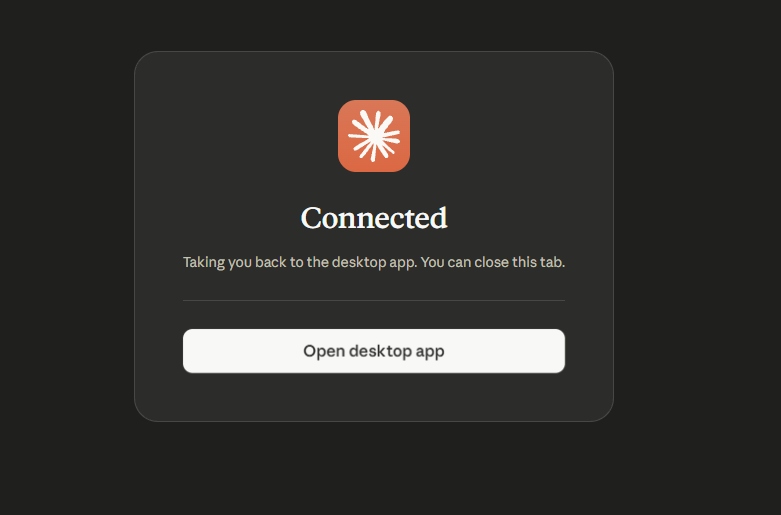
7 - Connection confirmed
You are redirected back to the Claude desktop app. The connection is now confirmed.
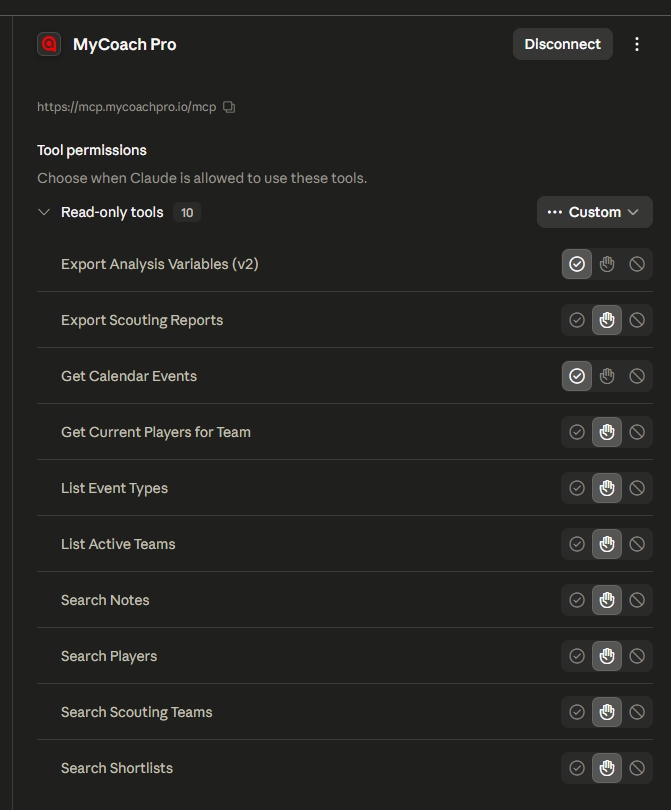
8 - Configure permissions
You can now choose which MyCoach Pro tools Claude is allowed to use. The connector is active by default, but it can be disabled or removed at any time.
Once configured through the desktop app, the connector will also be available in Claude on the web and on mobile.
ChatGPT setup
1 - Create an app in settings
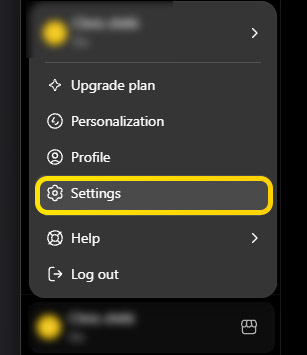
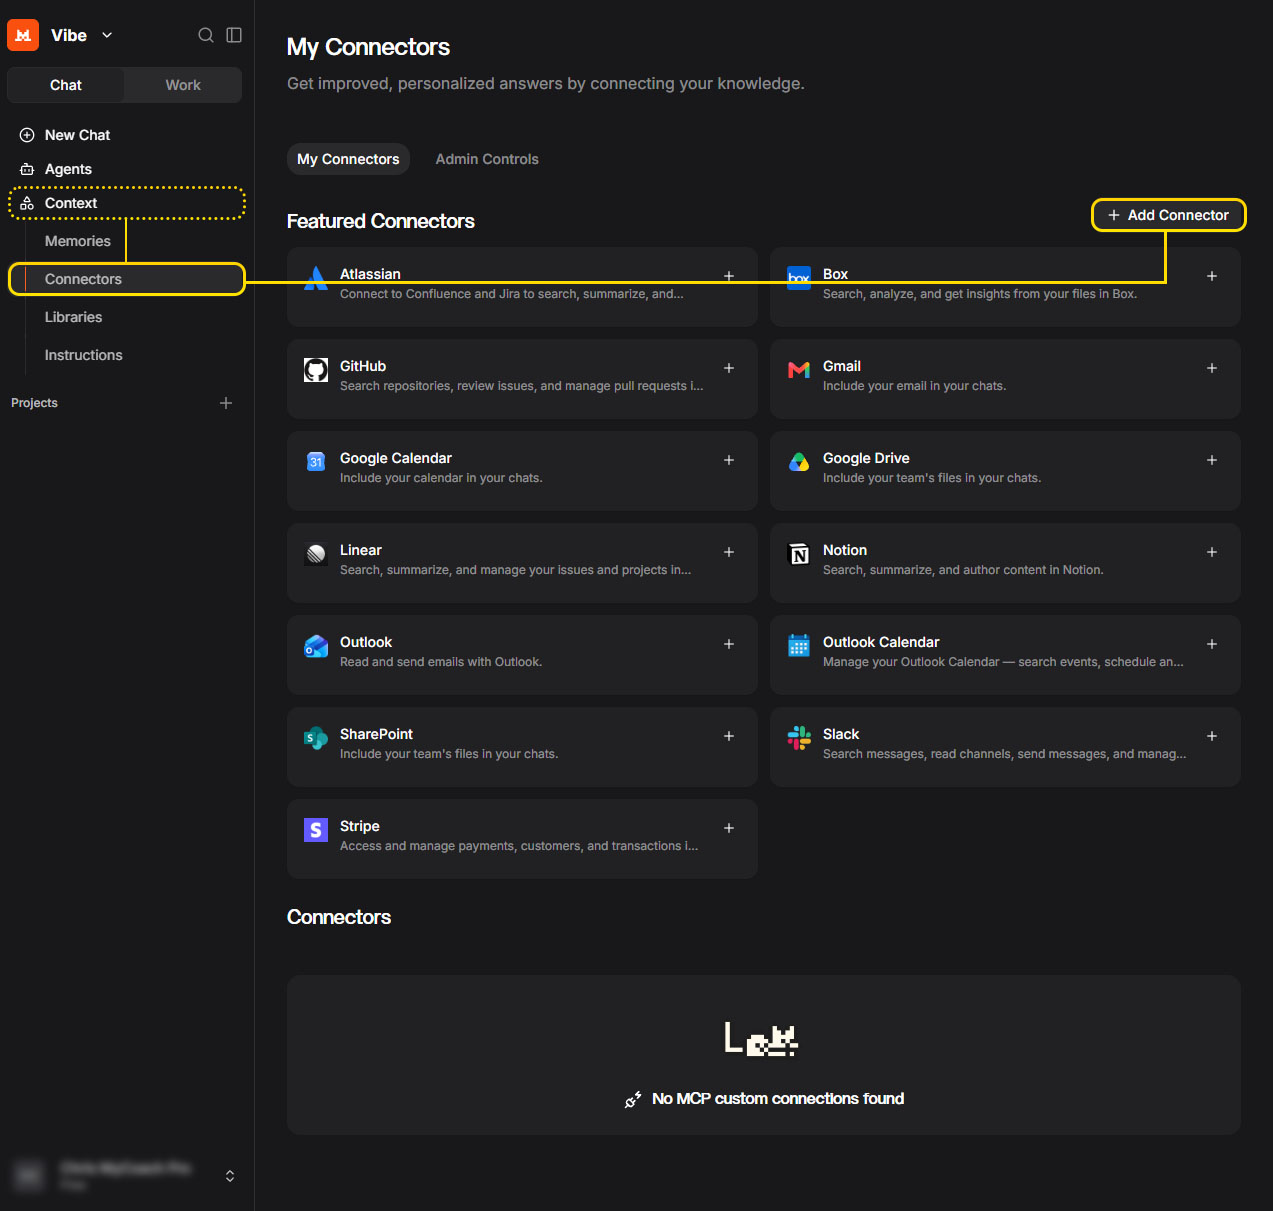
From your ChatGPT account, click your profile in the bottom-right corner and open settings.
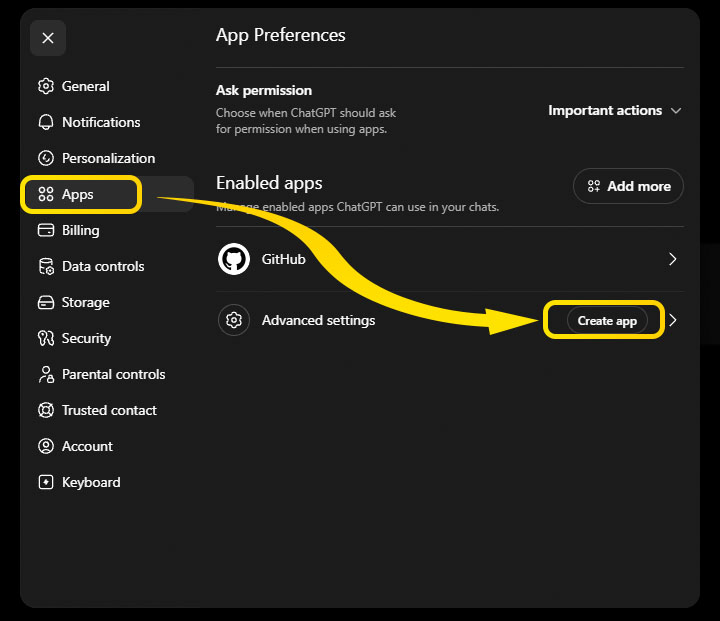
Then go to Apps, and click Create an app.
2 - Configure the MCP connector
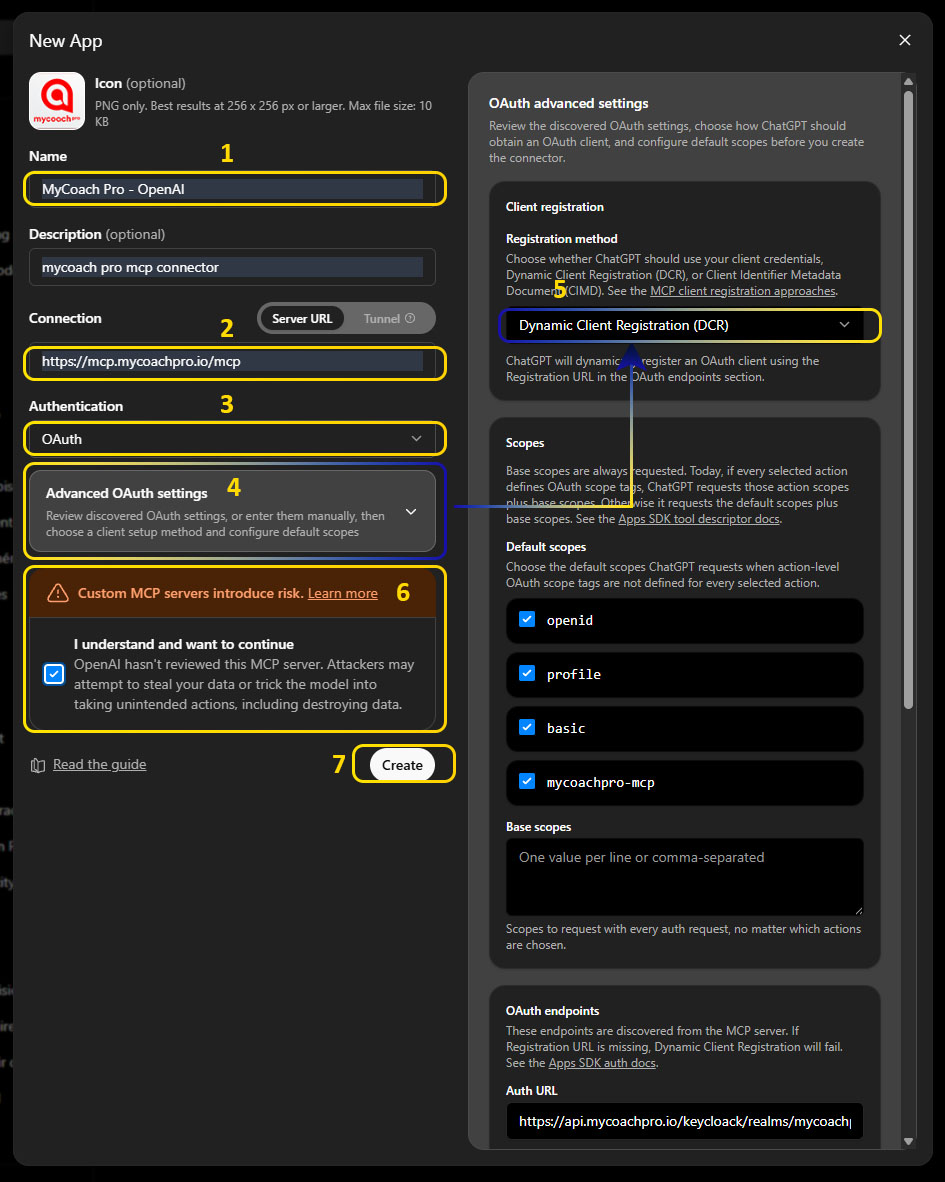
A dialog opens to configure your MCP connector:
- Name your connector
- Enter the MyCoach Pro MCP server URL:
https://mcp.mycoachpro.io/mcp - Set authentication to OAuth
- Click Advanced OAuth settings
- Set Client Registration to Dynamic Client Registration (DCR)
- Accept the terms of service
- Click Create to finish
3 - Sign in to MyCoach Pro
Click Sign in with '[your connector name]'. You will be redirected to a sign-in page.
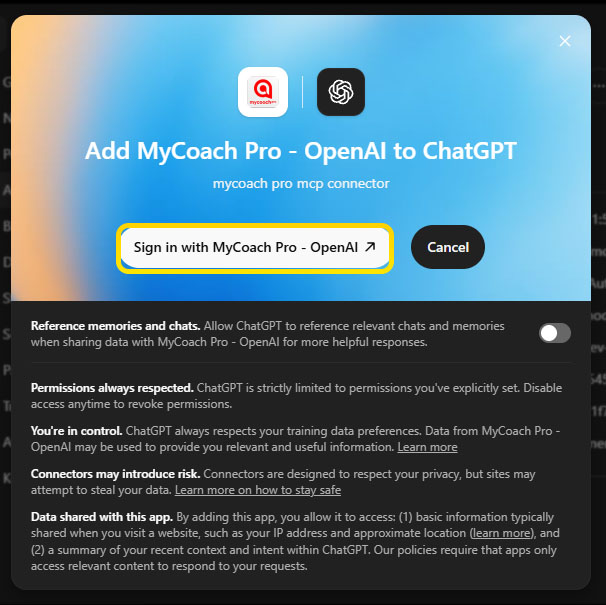
Enter your MyCoach Pro username and password, then click SIGN IN.
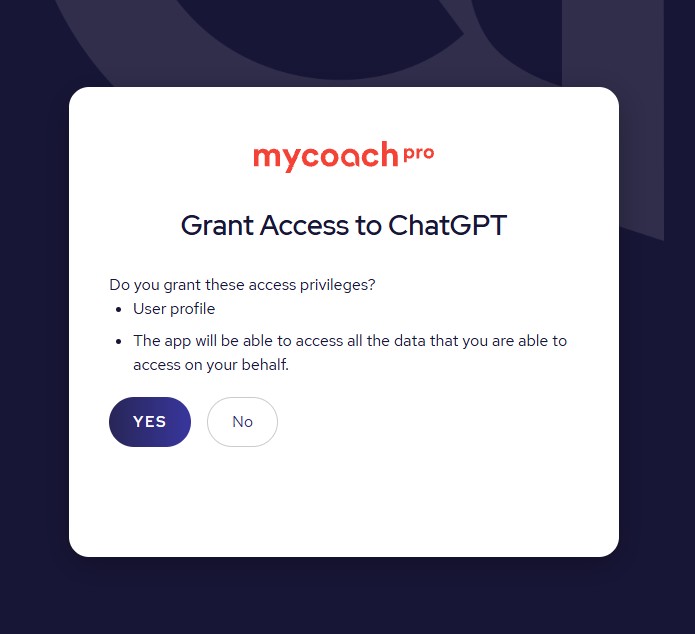
4 - Allow ChatGPT access
Allow ChatGPT to access your MyCoach Pro data by clicking YES.
Mistral AI setup
1 - Add a custom connector from Contexts
From your Mistral AI account, click Contexts, then Connectors, then + Add a connector.
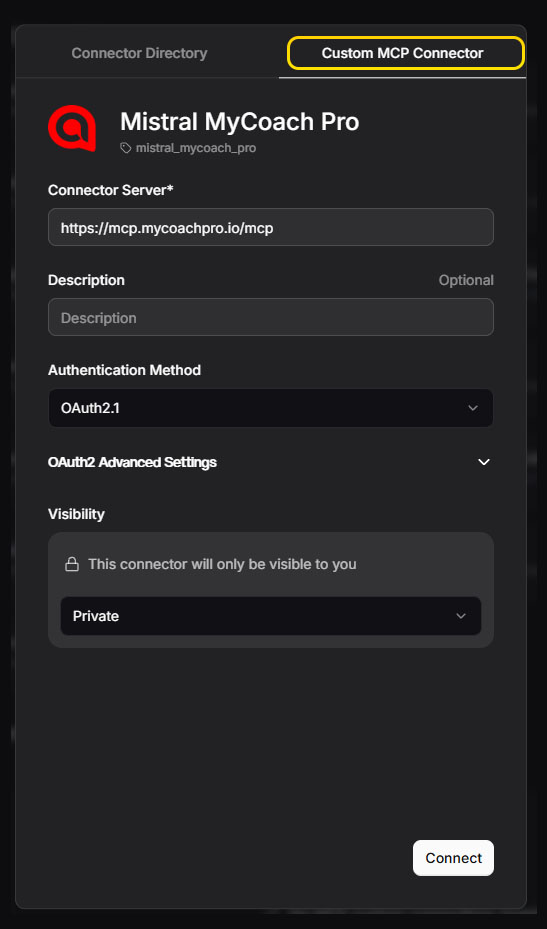
2 - Configure the new connector
Select the Custom MCP connector tab, then add a title. Enter the MyCoach Pro MCP server URL https://mcp.mycoachpro.io/mcp in the Connector server field. Mistral will automatically detect the authentication method and suggest OAuth 2.1; keep this option. Choose the connector visibility (Private or Workspace), then click Connect.
Enter your MyCoach Pro username and password, then click SIGN IN.
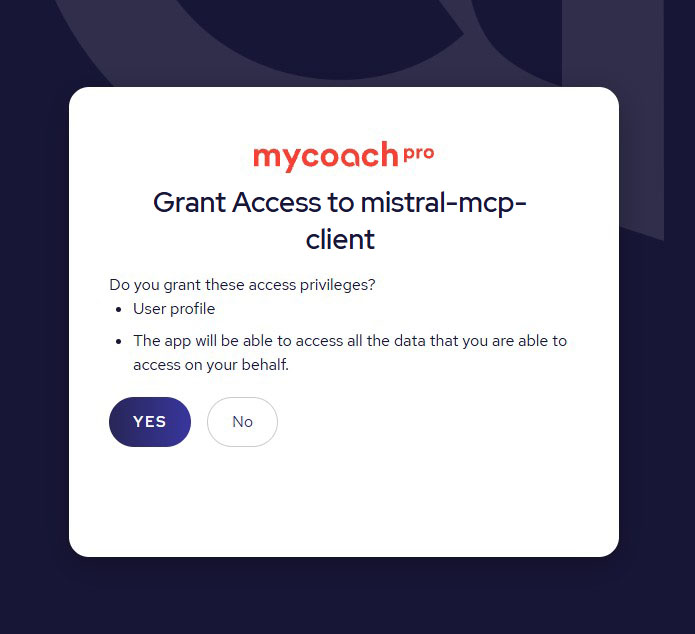
3 - Allow Mistral access
Allow Mistral to access your MyCoach Pro data by clicking YES.
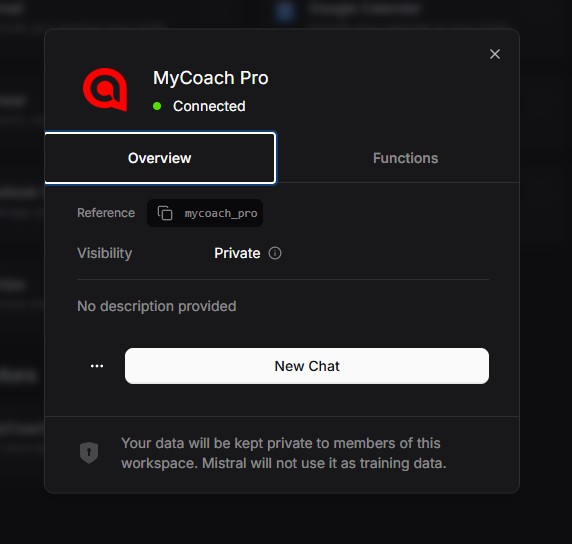
Click New chat to start a conversation with the active MyCoach Pro connector.
Lovable setup
1 - Find the Custom MCP connector
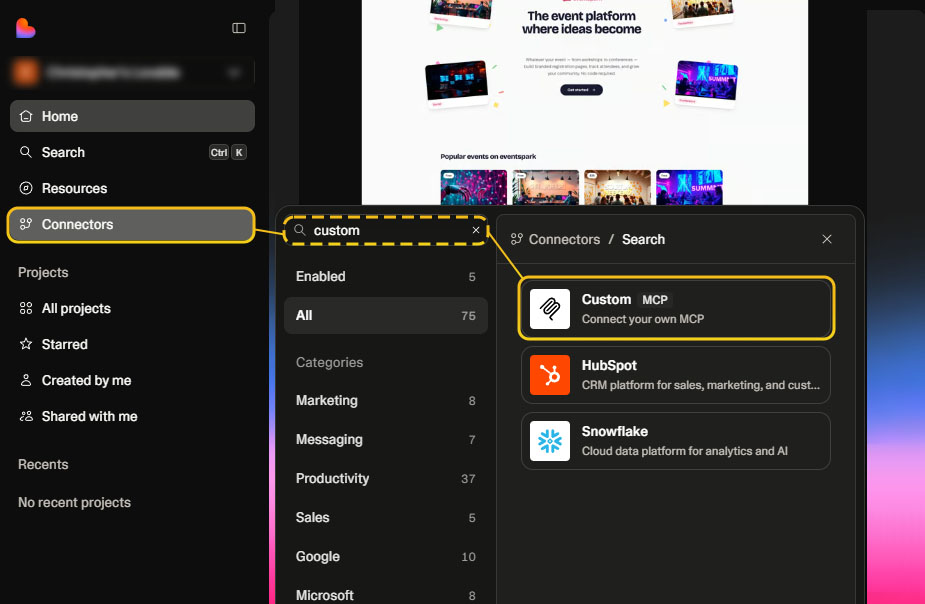
From your Lovable account, click Connectors, then search for Custom MCP. Click the Custom MCP connector.
2 - Configure the Custom MCP connector
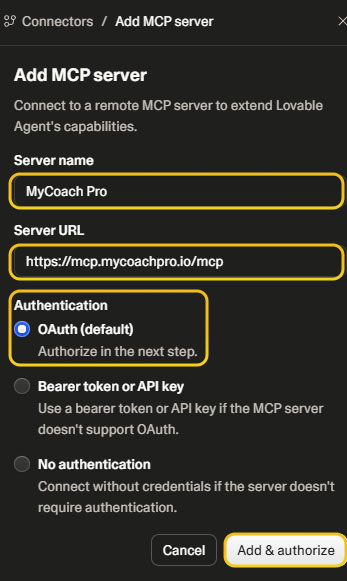
Fill in the server name, then add the URL https://mcp.mycoachpro.io/mcp, select OAuth authentication, and click Add & Authorize.
3 - Sign in to MyCoach Pro
Enter your MyCoach Pro username and password, then click SIGN IN.
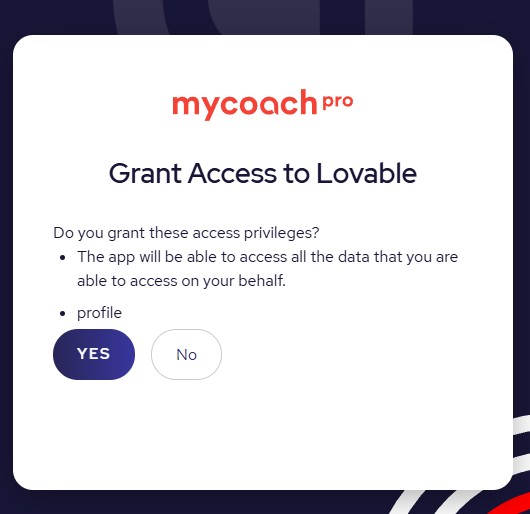
4 - Allow Lovable access
Allow Lovable to access your MyCoach Pro data by clicking YES.
Dust.tt setup
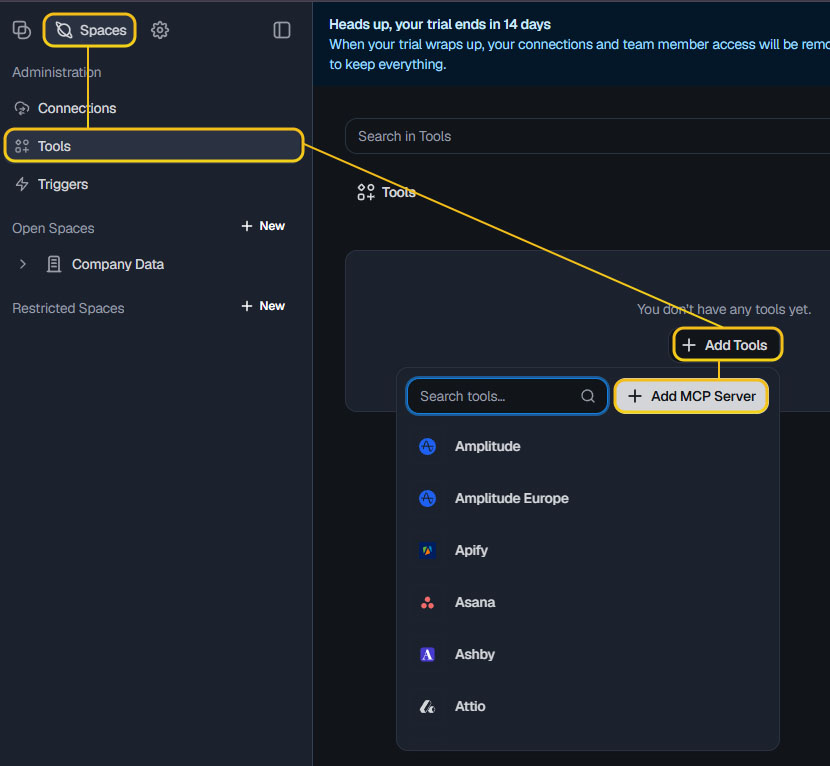
1 - Add an MCP server
From your dust.tt account, click Spaces, then Tools. Next, click Add tools, then Add MCP server.
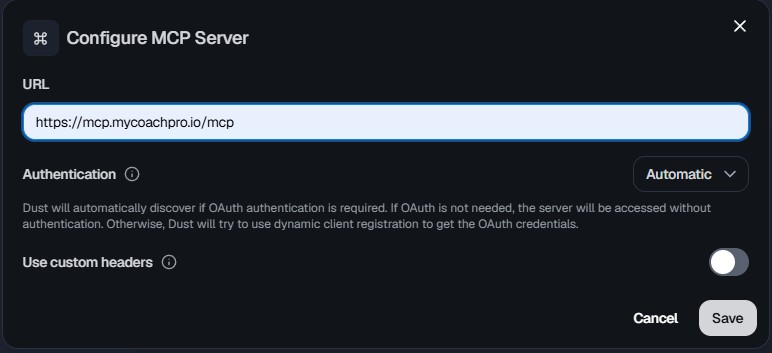
2 - Configure the MCP server
Add the URL https://mcp.mycoachpro.io/mcp, leave authentication on Automatic, then click Save.
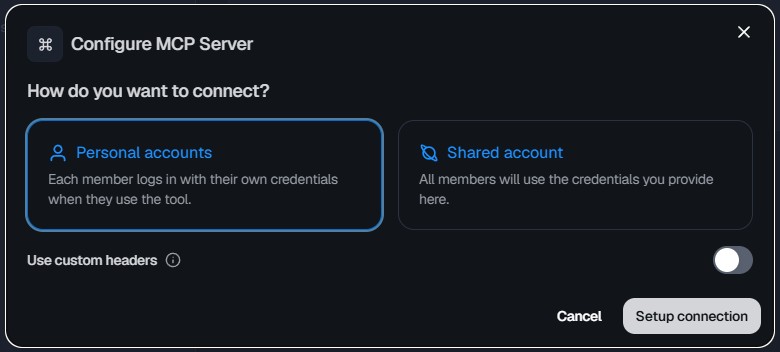
Then choose Personal accounts and click Setup connection.
3 - Sign in to MyCoach Pro
Enter your MyCoach Pro username and password, then click SIGN IN.
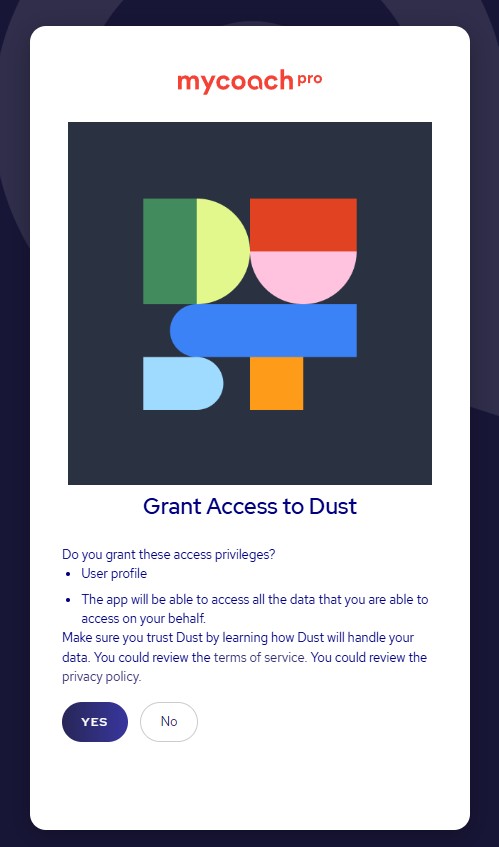
4 - Allow Dust access
Allow Dust to access your MyCoach Pro data by clicking YES.